What is the Purpose of Privacy and Security Hardening?
Limit the Information that is shared with your mobile provider, phone carrier and third party apps.
Configured Recommended Privacy Settings
Limit App Permissions:
Regularly review and limit app permissions. Only grant essential permissions and consider denying access to sensitive data like location, contacts, and microphone.
To review and limit app permissions on an Android device, you can:
- Open the Settings app
- Tap Apps
- Select the app you want to change
- Tap Permissions
- Review the permissions and toggle between Allow and Don't Allow
For quicker visibility, you can also review permissions by going to Settings > Privacy > Permission Manager. This allows you to review permissions based on specific settings, such as which apps have access to your camera.
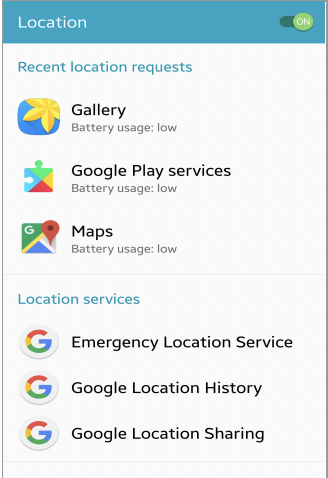
Start off by navigating to Settings>Location
➔ Tap Location>App permission.
- If you don't see "Location," tap Security & location>Location.
- If you have a work profile, tap Advanced>Location.
➔ Under ”Allowed all the time" and “Allowed only while in use,” view the apps that can use your phone's location.
➔ To change the app's permissions, tap it, then choose the location access for the app.
- Look for apps that are on "Allowed all the time". Most apps don't need to be on always (with the exception of some home door locks, etc). To limit the sharing of your location with apps, we recommend setting to “while using” or “never” based on your privacy preference.
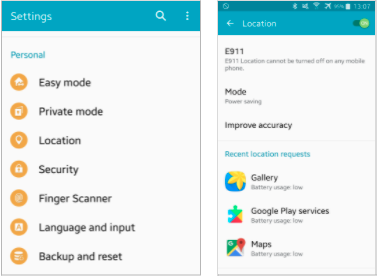
Important: If an app has permission to use your phone's location, it can use your phone’s approximate location, precise location, or both.
➔ Open your phone’s Settings app.
➔ Tap Apps & notifications.
➔ Tap an app. If you can’t find the app you want, first tap See all apps.
➔ Tap Permissions>More>All permissions.
➔ Under "Location," you can find the type of location the app requested. If you don't find "Location," this app hasn’t asked for your phone’s location.
Types of location access apps can request:
➔ Approximate location: The app can see that your phone is within a large area, a few hundred meters wide.
➔ Precise location: The app can see your phone’s exact location, like a dot on a map.
➔ In the foreground: The app can use your location only when the app is open on your screen or running in the background.
➔ In the background: The app can use location info at any time, even if you aren’t using it.
➔ We recommend setting the type of access an app has, based on your privacy preference. Approximate or In the foreground are good options for privacy conscious individuals.
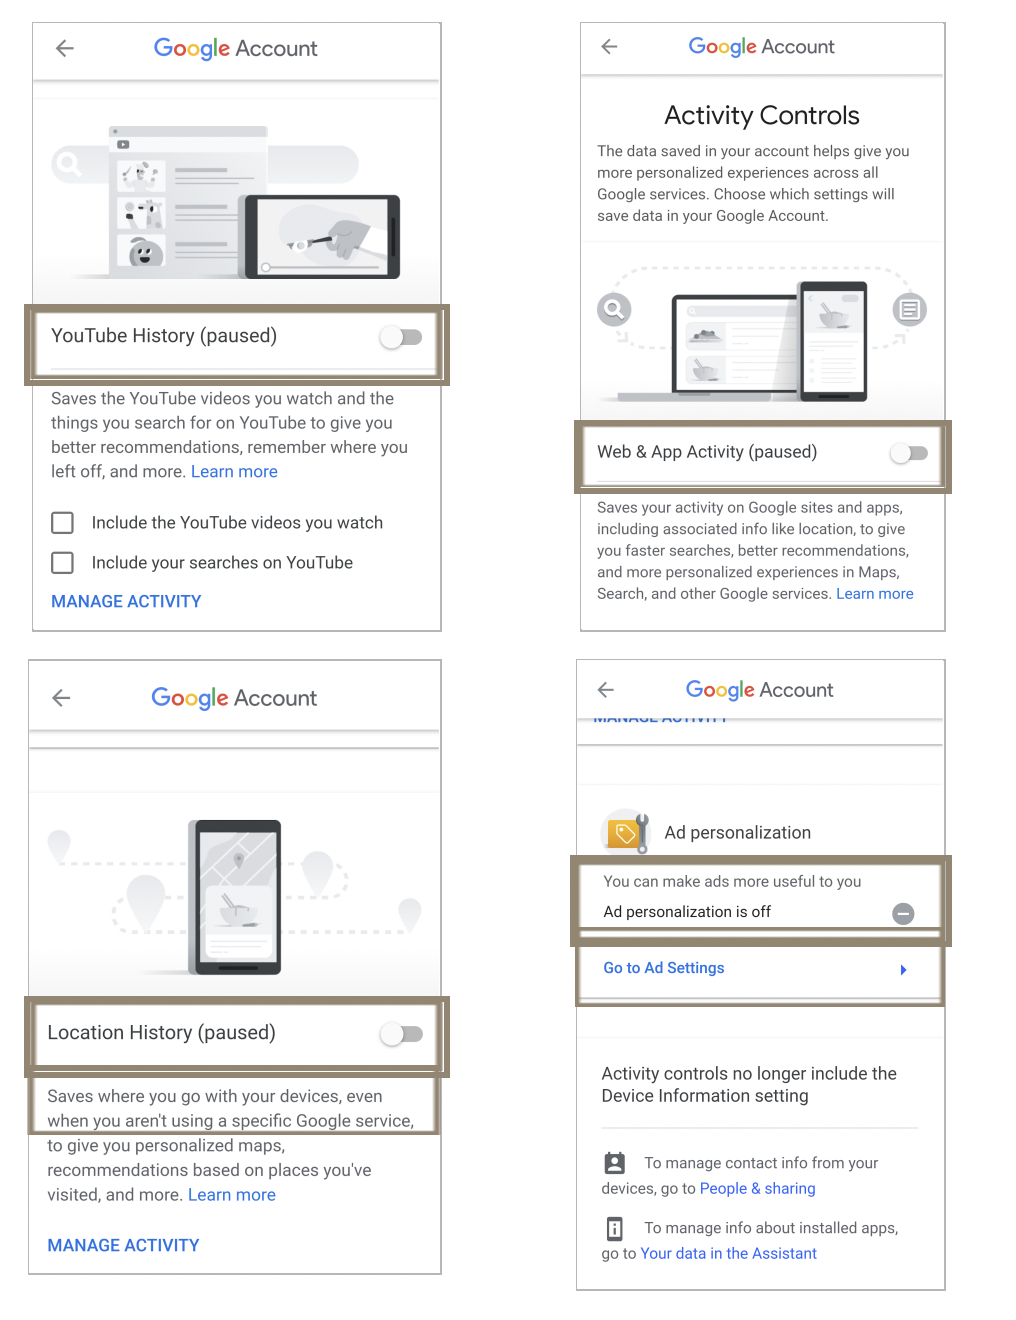
➔ If the Android device is paired with a Google Account, options are available to not allow location tracking of YouTube History, Web & App Activity, Location History, and even Ad personalization.
➔ If users are Hard Core Privacy or Mushy Middle, BlackCloak recommends to Not Allow/TURN OFF location tracking for YouTube, Web App Activity, Location History or Ad Personalization
Devices linked with a Google Account will also have the ability to view any password history provided by Google’s management system. It’s good practice to occasionally review what’s stored in there and remove any old entries that are no longer being used.
Configuring Recommended Security Settings
Enable Device Locking
You should ensure your mobile device has screen lock enabled in order to limit who can access your device. We recommend setting a pattern, PIN or password. You can do so by navigating to Settings>Security (or Security & Location)> Security>Screen lock.
You should also consider enabling the automatic screen lock after a certain amount of time and the Power button locking.
Multifactor Authentication (MFA)
Use MFA for your important accounts, preferably an authentication app (such as Google Authenticator) rather than SMS-based MFA, which can be vulnerable to SIM swapping.
Backup Regularly
This will ensure your files and data are encrypted in the backup.
Open Settings>Select Google>Select Backup
If this is your first time, do the following:
- Turn on Backup your device with Google One and follow the on-screen instructions
- Select the data you want to back up, such as photos, videos, or device data
Enable Android Find My Device Feature
This feature is available for Android 8.0 or higher. To use this feature, you must:
- Have a Gmail account set up on your device
- Have your device powered on and linked to your Google account
- Set a PIN, pattern, or password on your device
Open Settings>Tap Google or Google All Services>Tap Find My Device>Check that Find My Device is turned On
Turn of Wi-Fi & Bluetooth Scanning
Navigate back to Settings> Location (For older Android devices you may need to tap Advanced)>Wi-Fi & Bluetooth Scanning>
➔ If users are Hard Core Privacy or Mushy Middle, BlackCloak recommends to Not Allow/TURN OFF location tracking for YouTube, Web App Activity, Location History or Ad Personalization
➔ BlackCloak recommends that you Turn Off Wi-Fi Scanning and Turn Off Bluetooth scanning.
Enable Google Play Protect
In Settings → Security → Google Play Protect, ensure that Google Play Protect is enabled to scan apps for malware.
Be sure to use the Trusted Source feature to ensure you only download app from the Google Play store or from F-Droid. This will protect you from downloading malicious applications.
Regularly check your device for threats via Google Play Protect.
Restrict Background Data
In Settings → Network & Internet → Data usage, limit apps' ability to use background data, especially those that don't need to run in the background.
Disable Google Services and Tracking
Disable or reduce Google tracking services like Location History, Web & App Activity under Settings → Google→ Account → Data & personalization.
Consider using an Android version like GrapheneOS or LineageOS if you want to completely remove Google services.
Disable Unnecessary Features
Bluetooth and NFC should be turned off when not in use to prevent unauthorized access.
Disable Location Services when not needed. You can do this in Settings → Location.
Device and Security Updates
Be sure to update your devices, what new patches/updates are released.
➔ For Android updates navigate to: Settings> System>Advanced>System update> Follow steps on the screen
➔ For security updates navigate to: Settings>Security> then tap Security Update> Follow steps on the screen
➔ For Google Play system updates navigate to: Settings>Security> then tap Google Play system update> Follow steps on the screen
Configuring Security Settings for Apps
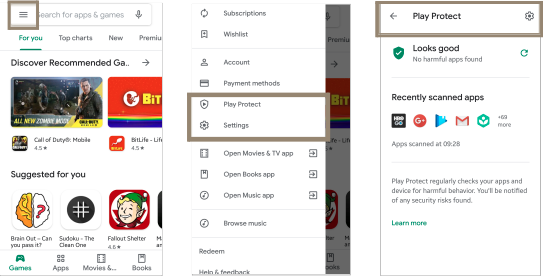
Ensuring Google Play Protect is running provides safeguarding of apps running on your phone from potentially dangerous software that may also endanger the operating system. For Google Play Protect navigate back to Settings> then to Google > Security
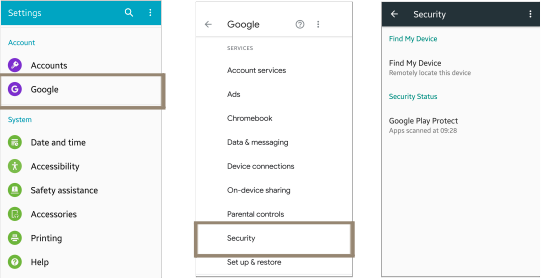
This can also be activated by navigating to the Google Play Store app on the
device. Then navigating the Menu icon > Play Protect> Settings> Turn Scan
device for security threats ON
Important: Google Play Protect is on by default, but you can turn it off. For
security, we recommend that you always keep Google Play Protect on.
Turn off Developer Mode if you don’t need it, as it can expose advanced system features that might be exploited.
Disable USB Debugging to prevent unauthorized access if your phone is connected to a computer.
Harden Google Services
Google Account: Review your Google Account's security settings. Limit what data you sync, disable Google activity tracking, and review the devices linked to your account.
Google Assistant & Location: Limit what Google Assistant can access and turn off location history.
Privacy Dashboard
Android 12 introduced a new privacy dashboard that will help you understand which apps have permission to access your camera, microphone, location, etc. You can find the dashboard by going to Settings > Privacy and opening up the Privacy dashboard.
Tap on Camera, for example, and you can see which apps are allowed to access your camera and which aren’t. Tapping on each app individually allows you to change the settings. It also shows you a timeline of permissions used.
Delete Your Advertising ID
Each device has its own unique advertising ID that allows apps to link data to your device. This builds a profile of you and your interests so they can show you more personalized ads. You can change this setting and reset the unique advertising ID to stop third parties from linking any information to your device this way. This won’t stop you from seeing ads but this will anonymize your data so they will no longer be based on your personal interests or browsing habits.
This can be done by doing the following. Navigate to Settings > Privacy then scroll to Ads. From here tap on Delete advertising ID.
